Wednesday, December 1, 2010

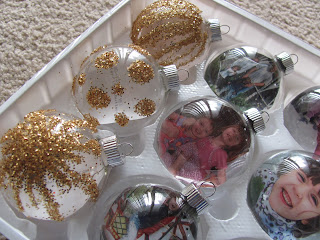
Photo ball ornaments

There are dozens of ways to get your favorite  family pictures on your tree. I particularly like this one.


Materials and cost:

One dozen clear glass ball ornaments - $5.99 at Hobby Lobby and 50% off that puts the cost at $3.00
12 photos - I use 4x6 prints I can get for $.19 each for a total of $2.28
One pair of scissors
One pair of tweezers
Elmers glue - bought at the back to school sales for $.20, 1/10 of a bottle used for a cost of $.02
Gold Glitter - $1.49, 50% off for a cost of $.75 and half used for a final cost of $.37
Red ribbon - $1.99 per roll, 50% off for a cost of $1.00, .25 roll used for a cost of $.25
Hot glue gun
Glue Stick - $.17, I used half of one for a total of $.08

Total cost - $6.00 or $.50 an ornament

Directions.

Cut the photos to fit inside the glass balls. This takes some trial and error. My later ornaments had a nicer fit than the first few.


Once the photo is cut, take the top off the ornament and roll the photo to fit through the opening. Be careful not to crease the picture.


Once the photo is all the way inside the ornament, use tweezers to gently unroll the picture and get it into place.


Once the photo is where you want it, place the top back on the ornament. You can use glue if you want it permanent. I did not.


Now, I suppose you could get really tricky and put a photo facing the other way as well. You could also use cotton, feathers, etc in the back of it to add a decorative flair and cover the back of the photo. I chose glitter. I wish I had gone with silver to match the ornament top, but I went with gold.


I put the glitter into a shallow plastic container to contain the mess a bit. Using the glue, I put designs along the back of the ornament. You can use stripes, stars, dots, scribbles. I played around with a few different things. Then dip into glitter and tap to remove excess.


Once the glue is dry, cut lengths of red ribbon about 4-6" long. I didn't measure. They are about as long as my hand. Use the glue gun and put a dot of glue at the top of the ornament as a place to secure the ribbon.


Bring the ribbon around the front, and tie it once.


Bring one end around in a loop, and use hot glue to secure in center, as one half of a bow


Bring the other side around, secure with glue, and your ornament is finished!

"Gilded" walnut ornaments

These adorable little ornaments are a throwback to years ago when people would decorate their trees with gilded fruits and nuts. Inside these cute, simple little ornaments is a fortune to be found when the nut is cracked open.


Materials and costs:

1 lb walnuts in their shells - $1.99
Gold paint - $1.49 per bottle, .25 bottle used for a total of $.37
1 sheet of paper - $.01
Gold ribbon, $1.99 per roll, 50% off making it $1.00 for the roll, 1/3 roll used for a total of $.33
Hot glue gun
1 glue stick - $.17
Green ribbon, $1.99 per roll, 50% off making it $1.00 for the roll, 1/3 roll used for a total of $.33

Cost for 16 ornaments - $3.20 or $.20 per ornament

Directions:

Very carefully split walnuts in half using a sharp knife. Use a butter knife to pull out nut meats and clear the shells.

Paint the outside of both halves of the walnut with gold paint and allow to dry.


Cut paper into thin strips about half an inch wide and 1.5 inches long. Use a marker or pen to write fortunes on the slips. These can be as simple or as complicated as you want. I went with simple.


You could also use carefully folded money or small trinkets depending on how elaborate you want to get with it.

Roll the fortunes up into tiny scrolls, and tie with a short piece of gold ribbon. Tuck into the walnut shell.


Using the hot glue gun, place a dot of glue at the top of one half of the shells. Loop the green ribbon around and secure both ends to the shell with the glue.

Use the glue gun to run a bead of glue around the edge of the shell, and carefully seal both halves of the shell back together.  They are now ready to hang on the tree! On Christmas morning, let the walnut hunt commence and seekers can crack the nuts open to find their fortune.

Monday, November 29, 2010

Personalized Christmas ornaments on a budget

Post one of several

My holiday ornaments are in terrible shape. I have been using the same ones my entire adult life. They are scuffed and sad looking thanks to curious toddler hands and climbing kittens and gigantic dog tails. New ornaments are not the cheapest things in the world. To get a deal you really have to buy the same old colored glass balls.

Instead of having a tree that looks just like everyone else's, I have decided to make all ornaments that go on my tree. I figured I would share the finished product here along with a cost breakdown. I didn't think about it today, or I would have done a step by step photo series, but I can do that with tomorrow's project.

Today's project is snowman ornaments.


Materials for one dozen:

One dozen plain white or silver ornaments. I bought the shatter proof type specifically meant for making ornaments at Hobby Lobby. They come one dozen to a package for $4.99, but I got them for 50% off so a dozen ornaments for $2.50
Black acrylic paint - $1.49 per bottle, a few drops used so maybe $.05 worth of paint
Orange acrylic - $1.49 per bottle and the same amount and breakdown as the black at $.05
Black felt - $.50 per sheet, 1/2 a sheet used so $.25
Pompoms - $2.99 per bag, half off, so $1.50 per bag. I used 1/4 of the bag so about $.37 total
Glue gun - I don't have one anymore so a new one ran $2.77 I am not going to count it toward the price though because I will use it for many things
Glue stick - $3.49 for 20. I used one for a total of about $.17

Total cost for 12 ornaments - $3.39 or $.28 per ornament.

Not only is the cost per ornament low, but it is easy enough for kids to help with making an ideal gift for family, friends and teachers.

Directions.

Using black paint, paint 2 black eyes and a dotted (coal) mouth on each ornament. Follow with the orange paint to make a carrot shaped nose.

Cut the black felt into thin strips, and hot glue on top to make the band for the earmuffs

Cut a tiny patch off each pompom to flatten it out, then use hot glue to secure to each side to make the muffs.

The results are fast, easy and super cute :)

Sunday, November 21, 2010

Ah ha!!

I couldn't remember how I took this blog offline, but I finally figured it out. Guess who's back!! Since I have started 3 other blogs I will organize things so that different types of subjects go on the different blogs. I will go back to money saving ideas for this one. My food photography blog isn't used much, but perhaps if I get back into it, it will be an interest. I have a daily 20 blog in which I answer the famous "what did you do all day?" question, and ramblings of a total headcase where I will post whaever doesn't fit on those. Feel free to read around.

I took my blog down initially after having a problem with certain people attempting to intimidate me with it, and use it against me. I have come to the conclusion that I have nothing to hide, and furthermore, I refuse to let people silence me. I will not give up that control of my life. I am so done with it.

I think moderated comments are on. I am still debating if I want to go back to open comments. I am not afraid of people disagreeing with something I post so feel free to comment however you wish. I will not be posting any comments that are hateful, nor will I be allowing my personal private business to be up for discussion. Anything else is fair game.

I missed my followers and hope to see you sharing with me again :)

Monday, February 22, 2010

We are here, and we are settled...mostly

I am not going into details just yet on the reason for our hasty move. It is a long, complicated story and I just don't have that kind of time at the moment.

Just posting today to show off a couple of pics of our new place, with more to come later.

We are in an apartment, which is close to 700 sq. ft smaller than the house. We also don't have the barn/garage anymore for storage, so it was interesting paring down to fit. No regrets. I am loving it. Most of the stuff we got rid of was larger furniture and crap given to us that we didn't use and just stuck in the garage waiting for a chance to sell/give it away. Half of our furniture we used for storage purposes because while the house was bigger, there were no closets. You have no idea how much I am loving the closet space in my new place. No more shelves, extra dressers, bins, etc. Closets and cupboards, oh my oh my.

So, to start out today, a view of my new LR and DR. We still have some unpacking to do (and are still using paper plates/plastic cups as much as I despise them, but it's not bad for being here less than a week.)


Sunday, February 7, 2010

Sorry for the lack of posting

Life has taken a pretty major turn and it looks like we are moving. I will go back to posting regularly after we move.

Saturday, January 23, 2010

Shopping Sales

I quit shopping sales for a while. I took it for granted that Aldi had the best prices and pretty much shopped there exclusively for a while. I started adding on another local store when I realized I couldn't get everything I wanted at Aldi. I still went with my meal plan and shopped around it. The problem is that it is hard to take advantage of sales if I have a strict shopping list. I don't get the paper, which means I don't get ads and never knew what was on sale.

My solution: Sunday Saver Most of the ads I will ever need are available online. I can now plan around what is on sale before I leave my house. I already know what Aldi's regular prices are so if I find a better deal I can get things elsewhere. I also keep an eye on price changes. For example, I used to buy 8oz blocks of cheese at Aldi for $1.49. Last time I went, the price had risen to $1.79. With that info, it is no longer cost efficient to buy cheese at Aldi since I can regularly find it on sale for $1.50. Would I drive out of my way for $0.29? No. However, since I usually have to make 2 stops anyway, might as well maximize where I can.

Monday, January 18, 2010

Flour tortillas

I have been looking for a good recipe for a while. I have had some issues in the past getting them the way I wanted them. Found this youtube tutorial the other night, tried it out, and the results were amazingly good. The recipe is also large enough to make a lot of tortillas which was another problem with other recipes, as they never seemed to make enough. We had enough for dinner for 4, with enough left over to do wraps for lunches all week.

Thursday, January 14, 2010

Big changes coming

I am going back to work...I think.

I worked at a daycare center until last year. I then went to homeschooling the girls so I put my notice in. I have subbed in a couple days a month at both the center I worked at and the closer one. I was just offered a position at the closer center with great hours, in the room I love to be in (the infant room). I decided to take it. With the girls back in school, I would like to say I have been getting a ton of my own schoolwork done, but I haven't. I have been working on it but never more than an hour or two a day. I would like to say my house is sparkly clean and I spend hours cleaning it to perfection but I don't. In the end I am going back to a job I love and the paychecks definitely won't hurt. While my husband makes enough to pay the bills it will be nice to have the extra income to put into savings and work on things like paying off his truck sooner. It doesn't hurt that I asked for a raise.

The hours will be during school hours so I won't miss out on anything at home. It no longer requires me to get up at the crack of dawn, in fact I will be leaving my house at the same time as my husband and kids. I will be home in time to take my daughter to swim.

I am still horribly nervous about another big change but I have already decided that 2010 is going to be awesome so how bad can it be?

So this blog is definitely going to go in a different direction than I planned when I first started it, but I don't think that is a bad thing. Just different.

I go in Monday to finalize everything. They already have my background check on file so there won't be a delay like there was when I was first hired. Wish me luck. I am going to need it.

Project 365: I have decided I don't like combining project 365 with my blog, so if you are looking for the photos, I am moving the project to http://365project.org/coralblur/365

Project 365 January 13

Since I didn't manage a blog post.

First is kid one with her fundraiser prize. I hate the stupid school fundraisers but she was excited about this one. She has them on upside down because she is a silly kid.


And a picture of my other puppy looking extra cute.

Tuesday, January 12, 2010

Childproofing, necessary?

I have to address this here even though my kids are well beyond this stage.

My beautiful niece was burned at 9 months old when her brother pulled a bag of popcorn out of the microwave, it caught fire, and he dropped it on his sister who had followed him into the kitchen. She nearly died, has been through multiple surgeries and will have scars for life.

On a message board I used to post on, the two year old daughter of another poster woke up in the middle of the night, climbed her dresser, pulled it over on herself and died. They didn't find her until the morning.

A child that lived next door to me long ago ran out of her house, into the road, was struck by a car and was hospitalized for several weeks.

Another child scaled a fridge and got into his mothers prescription medication, which was put up out of his reach, and ended up in the hospital.

Why am I posting about this? These parents were not irrisponsible jerks who failed to teach their children boundaries. These are examples of children being children, and the reason I childproofed my house. Think of how a simple baby gate, a wall bracket, doorknob cover or a lock box could potentially have changed their lives. Don't get me wrong. I am not blaming these parents for things there is no way they could have seen coming, nor is there a guarantee that childproofing would have helped. However, I like to learn from others.

I have read people talking about how babyproofing is unneccesary. It doesn't teach children boundaries. Children have to learn how to fail. I have said it before, and I will say it again: I prefer that my children learn how to fail with things that will not potentially kill them.

Childproofing the most dangerous things is really such a simple thing. Wall brackets are not expensive or obtrusive. Keeping cleaners and medicines locked away does not mean that you cannot teach your children about them. A child being kept out of the kitchen when they are tiny will not stunt their development. I don't understand people who can see the dangers of allowing this stuff to go (through the tragedies of other people) and not do something about it. Just because it wasn't your kid this time, doesn't mean it can't happen to you. Kids are fast and they test boundaries. Fact.

How will kids learn boundaries if they don't have access? Well. I have a brain. My kids did not have access to cleaners as toddlers but they were still taught the word poison, and that the cleaners would make them sick. My children did not have access to medication but I still taught them that it could make them sick if they took the wrong ones or too much and so only mom and dad can give them medicine. They were not allowed to climb the furniture, even if it was bolted to the wall. Childproofing does not get you out of teaching your child. It simply gives you an extra layer of protection.

Now I did not put breakables out of reach once they were older than 1. I took the risk that there was a chance they could be broken. Sometimes they were. Mostly not. I could take my kids anywhere and be fairly confident they would keep their hands to themselves. Childproofing does not equal failing to teach your children manners.

I also have to say that some child-safe things are just good habit. I still mount shelving to the wall because it is more stable. I still turn my pan handles in. It's just good practice.

And one last story. I was very proactive in teaching my young children the proper ways to go up and down the stairs. When my daughter was 2, we were visiting my mother-in-law and she was carefully walking down the stairs to the basement, one at a time, holding the railing. My dog, who had never been down there, took that opportunity to run down. My two year old child was knocked down the stairs, all the way to the bottom and hit her head on the concrete. She was fine, luckily. A babygate could have kept the dog off the steps. That was almost 10 years ago and it's still clear as day in my head. Every close call we have ever had has stayed with me like it was yesterday. I can't imagine what it must be like for parents of children who were seriously injured or killed. All I know is that I would much rather be safe than that kind of sorry.

Project 365: The things my days are filled with.

Monday, January 11, 2010

Dogs belong inside

I will never ever ever understand the point of buying or adopting a dog only to keep it chained outside or locked in an outdoor kennel.

1. Dogs get hot and cold too. Wild dogs travel in packs and keep each other warm. They can find adequate shade and shelter when it is hot or rainy. You would let your children come inside if they were cold. Let the damn dog in.

2. Dogs are pack animals. Having one, or even two dogs chained outside is completely against their nature. I don't recommend having a pack of dogs. Instead, make them a part of your pack. They want love, affection, an order.

3. Dogs chained outside for hours tend to knock over food and water dishes. You try sitting outside in 90 degree heat after knocking over your Dasani bottle and not go in for a new one.

This issue is a huge huge pet peeve of mine. I can't believe how many people find it acceptable. I know people in real life who do this. I know people on message boards who do this. In every state we have been in, there is always at least one asshole neglecting his poor dog.

And let me add that if you cannot afford to spay/neuter, treat for fleas/worms/heartworm, and keep them up to date on their shots (everyone has an oops, missed the deadline moment, but I am talking never bothered) then you have no business having a pet. It's a responsibility.


Project 365: My pampered baby likes to lay in front of MY heater I brought in to warm me up and steal all the heat.

Sunday, January 10, 2010

The missing post

I had a post composed about stealing photography by those who scan and print professional pictures. I then realized that I had gotten a bit sanctamonious and ranty. The idea behind the missing post is that you are stealing from photographers when you do that. So don't. ;)

Project 365: Reaching here because today was one of those lazy days and I honestly had a hard time coming up with subject matter, so I took a picture of my husband, because I think he is cute, and he was handy.

Saturday, January 9, 2010

Open source software - the free alternative

We are a computer family. My husband is a computer nerd and is huge into the open source movement. We haven't used Windows in our house in years. We instead use Linux (although last month, dh got his first Mac, which he loves but that is another post) I honestly don't remember if I am running Arch Linux or Debian. I honestly don't recommend running Linux unless you are a computer dork, or you are married to one because it isn't the most user friendly operating system. Yet. It has come a long long way since my husband started playing with it in 1999, but it has a bit to go to make it user stupid. ;)

There are, however, very user friendly open source programs out there that are just as good, or better than the commercially available products. I am putting my favorites out there.

1. GIMP

GIMP is a image editing program that is amazing. I would put it pretty close to being on par with Adobe Photoshop. I have not used CS3, but I was trained on Photoshop CS2 in college, and while it is a great product, I can't afford the hefty pricetag, and we don't steal software. So we use GIMP. It does everything I need it to do from layers to filters to cropping, scaling, levels and curves. I went back and forth between GIMP at home and Photoshop at school and you can't tell in my images which one was edited on what. The only gripe I have is that the plugins for GIMP for batch processing and RAW editing do not compare to Adobe Bridge, but for the average user, GIMP is more than powerful enough for your needs. The GIMP website also has tutorials to make using it a bit easier.

2. Open Office

I use Open Office in place of Microsoft Office. It includes an entire suite with spreadsheets, documents, templates, and so on. It can save in any format you need (for example you can save in .doc, .rtf, etc) I have used the presentation software and saved it in Power Point format and did not have an issue. All of my school work is written using this software.

3. Pidgin

Pidgen is an instant messaging program. Now granted, people can download things like yahoo, msn messenger and so on for free. I like pidgin because it combines all the accounts in one, which is nice when I have some friends using yahoo and others using msn.

There is a whole world of open source software out there. These are simply my most 3 used programs. I suggest anyone look at alternatives before purchasing software. The money you would otherwise spend can be donated to the projects should you find them extraordinarily useful.


Project 365: Popcorn from last night's festivities.

The photo of the day from Friday, January 8

Since I was too busy to post yesterday, here is my project 365 photo, which came from my daughters' sleepover. They were snuggled down on the pullout, taking turns playing a wii game.

Thursday, January 7, 2010

Spinach Mascarpone Soup $4.50

I have a love affair with soup. I love just about any kind of soup. I discovered this recipe a few years ago and fell in love. My family? Not so much. Not one of them really cares for any kind of soup, which means I don't get this very often. Still, it's heaven in a bowl so I thought I would share it.


2 Tbsp butter
1 bunch scallions, trimmed and chopped
1 Tbsp minced garlic
1 cup fresh spinach (pack it down tight though, you want a good amount)
3.5 cups vegetable stock
1 cup mascarpone

Melt the butter in a large pan. Add the scallions and garlic and cook gently for 5 minutes or until softened.

Pack the spinach into the pan, add the stock and bring to a boil. Reduce heat and let simmer covered, 15-20 minutes.

When done, process in a food processor or with a handheld blender until smooth. Return to pan and add mascarpone cheese and cook over low, stirring gently, until smooth

Garnish with croutons and enjoy.


Project 365: My puppy, who is one hell of a handful and a whole lot of fun. We have had him almost a year now.

Wednesday, January 6, 2010

A remodeling tour

I figured I would take some time and show my readers some of the before and after work on my house. There is still a TON to do, but I will start with what is probably the nicest room in my house. It has probably always been the nicest room but I like it much much better now that when we got the place.

First, an overview of what it looks like now.


Before I continue, let me tell you what we have done.

The paint on the walls was done in 2006 or so. It needs to be retouched in places where it has chipped off, and I ran out of the red before the coverage was good enough in one area. Just FYI, 1 gallon of Apple a Day red is not enough to cover 2 walls. I had never worked with darker paint before so this was definitely an interesting experience. 2 walls are red, the others are taupe and the trim is white. It beats the hell out of the bright aqua nightmare it was. Blue is supposed to be soothing, but I promise you this color was not.

We ripped out the carpet in the summer of 2007. We didn't have much choice. My dog brought fleas in the house. That was a nightmare. None of the commercial flea products worked (in fact, Frontline gave my cat a nice big bald spot but he still had fleas) The bombs to get them out of the carpet failed. I was tired of coating our house in chemicals, so out it came. We were on subfloor for a few weeks before I found something I liked. The wood laminate planks here cost $.79/sq ft. It was an amazing deal and I managed to get enough flooring for the living room and hall for under $300.

The ceiling fan was a Salvation Army find for $8. It is much much nicer than the fug one that was in there before.

There is still some things that need to be done on top of the paint. My LR is not trimmed. We have the boards, the router, the paint and the nails but my husband has been a bit short on time. We had other remodeling projects that needed to be addressed first. So we lack baseboards. Not a biggie.

The back door is gross and leaky. We have one of those As Seen on TV things for under the door that helps, but it really is just an ugly crappy door. Not a priority at the moment.

The living room opens up to the dining room. You have to go up a step. The step needs to be redone with a wood that can be stained to match the floor. Right now it is a plywood.

You may notice on the one wall there is a bunch of outlets all in a line up the wall (see pics below) Only the top one works. That needs to be redone, and the extras removed.

We need new windows badly. That is going to be a project that will hopefully be done this summer.

All in all, I love my LR. So here are the before and after shots. The before shots were taken the day we moved in, October 2004. The after shots were taken yesterday.


I will get to other rooms at some point. It's a work in progress.

Project 365: Tonight, I am relaxing.

Tuesday, January 5, 2010

What's in your burger?

A post on another blog got an interesting discussion going on the safety of ground beef. Seemed like a good topic for today.

Several years ago, I read Fast Food Nation by Eric Schlosser. It covered several aspects of the fast food industry, but the most appaling to me by far was the American slaughter houses, and what, exactly, goes into your meat.

After collecting ground beef samples from meat processing plants around the country in 1996, the USDA determined that 7.5% of the beef samples were contaminated with Salmonella, 11.7% were contaminated with Listeria monocytogenes, 30% were contaminated with Staphylococcus Aureus, and 53.3% were contaminated with Clostridium perfringens5.


By far, the most prevalent, and the scariest contamination is e-coli. E-coli gets into the meat by contamination of the meat by fecal matter. Poop. Crap. In the meat. It is on the hides of the cattle, and can be spilled from the intestines. The companies use ammonia to get rid of it, assuming of course that it is caught. Yum. Ammonia. Sounds like a tasty treat to me!

Cooking ground beef to 160 degrees is supposed to kill e-coli right? Well yes. However, studies are showing that kitchen cross contamination is a serious problem, when even soap and hot water failed to get rid of all traces of the bacteria.

And I can't get over the fact that there is poop. In your meat.

Last year the New York Times ran an article on just how much of a problem it is. It is interesting, and scary reading.

My solution? Ditch red meat, or at least most of it. In the long run I want to ditch all meat outside of fish. I don't have an issue with eggs and milk, mostly because I find them useful and easier to again, in the long run, switch to a friendlier option. Unfortunately, my husband and children are not really on board with dumping meat entirely. Our red meat consumption however, is down dramatically. On the rare occasions we do eat ground beef, I buy cuts of steak and we grind it ourselves. At least I know what cow parts are making it in. I am not feeding my kids brain stems and ammonia soaked mash.

And looking at things from the green point of view, cattle take up an amazing amount of resources. The New York Times ran another article on the environmental impact of beef.

"Global demand for meat has multiplied in recent years, encouraged by growing affluence and nourished by the proliferation of huge, confined animal feeding operations. These assembly-line meat factories consume enormous amounts of energy, pollute water supplies, generate significant greenhouse gases and require ever-increasing amounts of corn, soy and other grains, a dependency that has led to the destruction of vast swaths of the world’s tropical rain forests."


I really recommend reading that article. It is really informational.

Producing 2.2 lbs of beef generates as much greenhouse gas as driving for 3 hours. Add that one up. That doesn't take into consideration the water consumption, grain consumption, etc. Just some numbers to think about.

If everyone just cut back once a week, imagine the impact.


Project 365: Speaking of nasty things, most people are not fond of my daughter's pets. They are seriously the best small animal you can get for a kid. They are smart, friendly, and cuddly if you can get past your squeemishness. They are not mean like hamsters or fragile like guinea pigs or noisy like birds. So I am introducing everyone to Whiskers and Clove.

Monday, January 4, 2010

Greener Burial Options

Since my grandpa's death, this has been on my mind lately.

According to this site ever year, American funerals use 30 million board feet of casket wood, 90,000 tons of steel, 1.6 tons of concrete and 800,000 gallons of embalming fluid. That doesn't take into account the thousands of acres of land dedicated to cemetaries.

I have always found traditional funerals to be somewhat wasteful, and planned on cremation. I learned from the same site that many times cremation releases dioxin, hydrochloric acid, sulfer dioxide and carbon dioxide into the environment. So what green options are out there?

After reading on this blog I found a few ideas for greener burial options.

Instead of a traditional casket one can get one made from wicker, bamboo or wood from a sustainable source such as pine. In place of embalming fluid, dry ice can be used to preserve the body until burial. There are green cemetaries where there are no vaults and no headstones. This allows the planting of trees so that land doesn't go to waste, and allows natural decomposition of the body to return to the earth.

There are also green crematories that meet or exceed emissions standards. Cremains can be mixed with concrete and put into the ocean to encourage the growth of coral reefs.

The most useful, and most frugal option I found was the donation of the body to science. It allows medical professionals to learn things about the human body which is helpful to the living. Many places offer free cremation as well. I really think this is the way I want to go. I am already an organ donor. I really won't care one way or another once I am dead. I might as well make my death useful to someone. You can find information about body donation here and here.

For my project 365 image of the day: we actually got a bit of snow this morning. I am in MI but the snow keeps missing us so it was nice to wake up and see a little bit. It is still snowing for now so maybe we will get enough to do a bit of sledding.

Sunday, January 3, 2010

Cold water laundry

I was taught to use hot water on whites and towels, cold water on dark and bright colors and warm water on everything else when it comes to doing laundry. Honestly, I am lazy so I mix everything together most of the time and stick it on warm. My whites are not as bright as they could be and I am sure I am not helping the fade factor on deeper colored clothing.

I started looking into washing laundry in cold water. Does the laundry get clean enough? How much does it really save as far as cost goes? Does it really help environmentally? Let's look at some numbers.

According to the US department of energy,
About 90% of the energy used for washing clothes in a conventional top-load washer is for heating the water.


That is a lot. It really is.

According to this site for a gas water heater, to wash on hot costs $.39-$.52 per load depending on rinse temp, to wash on warm costs $.27-$.39 per load while washing with cold costs $.14 per load. If the average family does 400 loads per year, that is a difference of $208 for a hot/warm cycle versus $56 for a cold/cold cycle or $152 per year. That isn't huge but added up over a lifetime there is a definite difference.

But do clothes get clean on the cold cycle. Well, mostly. The recommendation is to wash diapers and towels along with anything else that you need to worry about sanitary conditions on the hot water cycle along with anything with oily stains. For most clothing though you will not be able to tell the difference between the laundry washed in cold water vs. the laundry washed in warm or hot water.

So I have a new goal of changing my laundry habits.

Project 365: Today I came into a new set of dishes. This was my grandpa's set. Since my dishes were dwindling thanks to careless preteen handling, I gladly accepted these very pretty dishes. I am always happy to change things up a bit, and they remind me of him <3

Saturday, January 2, 2010

Real snow cones

Years ago my inlaws bought me a snow cone maker for Christmas. Now it was a nice gesture and we used it once or twice but for the most part it just took up a ton of space for little reward.

One thing I love though is real snow cones, made of course, with real snow. With snow falling all over the country right now, I figured I would share a super simple, super cheap recipe for real snow cones. Kids love this.

The main ingredient of course is fresh, CLEAN snow. I say clean because with two dogs we have to be very careful where we get our snow. I like getting the top layer off the deck rails. I leave a layer so we don't actually make it all the way down to the wood, but we end up with a good amount of fluffy snow.

I then take Kool-aid mix (or knock off, more likely) and mix it with only half the required water to make more of a syrup. Dump over snow and enjoy. Winter is a bit cold for a frosty treat but the novelty will entertain kids like nothing else.

Why no pictures? Because despite living in one of the snowier states, this year we haven't had enough to enjoy, so hopefully we will have our annual treat later this winter.

Now as to pictures I do have, for project 365 today I have a couple of pictures. My mom and stepdad used to drive a truck, and the few days a month they were home they stayed in the heated office in our garage/barn. It really is a nice enough room and they had access to the house for kitchen/bathroom. They recently moved their stuff out and we moved the workout equipment out to that room. Today I went through and did a thorough cleaning and got everything organized. So far I have kept to my resolution and worked out daily.


And a picture of my husband goofing around on the ab lounger. He is my workout partner :)

Friday, January 1, 2010

Another day, another dollar

I posted yesterday about my resolutions but I have another goal that I have not posted about. My food bill has gone up. I got lazy over the holidays and spent way more than I should have. Now granted I purchased a lot more food but I paid more than I otherwise would.

My new goal is to attempt to feed this family and the animals for $200 a month or less. I have been spending $300-400 a month. How do I plan on cutting that in half? I am making a few changes.

The first is in regards to the animals. We had a big automatic feeder for the dogs. They would graze all day long. My older dog was getting fat and the puppy was having a harder time with house training because he was unpredictable. Over the past 2 to 3 weeks I have changed their feedings. They now get fed once in the morning, and once in the evening. They have been getting 2 cups of food each, for each feeding. Now that we are settling into a new routine, they have been leaving food in their bowls between feedings so I plan on changing it to 1.5 cups per feeding. Dogs their size should be getting between 2.5-4 cups per day. 3 seems reasonable. I can adjust as needed. Already we went from going through a 20 lb bag of food per week to a 20 lb bag every two weeks. This allows me to feed them a higher quality food without problem. This also keeps the cats out of the dog food which is much better for their health (and their odor).

I also plan to be a lot more proactive when it comes to sales. Since I am in town 4 days a week for my daughters swim anyway I am going to start exploring more stores for better deals. We have a bakery outlet we have been to before and the deals on bread and bread products are unbeatable. I haven't made the time to go out there even though it isn't much farther. I just hate store hopping in one trip. Instead I will break up my grocery trips without really driving extra miles.

I am going for less waste this year too. We are fairly good about eating leftovers but lately a lot of produce has been going to waste along with lunch meat and certain harder to heat leftovers. I plan on being more creative with my leftover use, buy less lunch meat as my children prefer peanut butter in their lunches, and if I overbuy produce I want to be more proactive about getting it into the freezer. Less waste = less I have to buy.

I don't know that I will be able to pull it off in my first or even second and third trips but in the next few months we will be spending less on groceries without sacrificing our health or our taste buds.

Now for my project 365 picture of the day. This is the last sign of the holidays in my house. The tree was taken down a few days ago, all the Christmas stuff has been put away. This remains hanging outside and still looks lovely for a real wreath so I plan on leaving it for a while longer.


Happy New Year! I have high hopes and expectations for 2010 and I am determined that this is going to be a better year overall.

And adding one my husband took, in hopes that he will take up project 365 himself. This is me with two of my boys, one who hasn't yet figured out he is much much too big to be a lap dog.