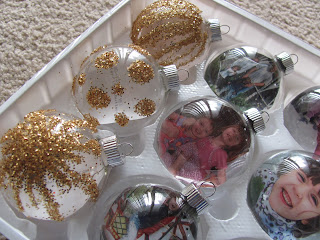
There are dozens of ways to get your favorite family pictures on your tree. I particularly like this one.
Materials and cost:
One dozen clear glass ball ornaments - $5.99 at Hobby Lobby and 50% off that puts the cost at $3.00
12 photos - I use 4x6 prints I can get for $.19 each for a total of $2.28
One pair of scissors
One pair of tweezers
Elmers glue - bought at the back to school sales for $.20, 1/10 of a bottle used for a cost of $.02
Gold Glitter - $1.49, 50% off for a cost of $.75 and half used for a final cost of $.37
Red ribbon - $1.99 per roll, 50% off for a cost of $1.00, .25 roll used for a cost of $.25
Hot glue gun
Glue Stick - $.17, I used half of one for a total of $.08
Total cost - $6.00 or $.50 an ornament
Directions.
Cut the photos to fit inside the glass balls. This takes some trial and error. My later ornaments had a nicer fit than the first few.
Once the photo is cut, take the top off the ornament and roll the photo to fit through the opening. Be careful not to crease the picture.
Once the photo is all the way inside the ornament, use tweezers to gently unroll the picture and get it into place.
Once the photo is where you want it, place the top back on the ornament. You can use glue if you want it permanent. I did not.
Now, I suppose you could get really tricky and put a photo facing the other way as well. You could also use cotton, feathers, etc in the back of it to add a decorative flair and cover the back of the photo. I chose glitter. I wish I had gone with silver to match the ornament top, but I went with gold.
I put the glitter into a shallow plastic container to contain the mess a bit. Using the glue, I put designs along the back of the ornament. You can use stripes, stars, dots, scribbles. I played around with a few different things. Then dip into glitter and tap to remove excess.
Once the glue is dry, cut lengths of red ribbon about 4-6" long. I didn't measure. They are about as long as my hand. Use the glue gun and put a dot of glue at the top of the ornament as a place to secure the ribbon.
Bring the ribbon around the front, and tie it once.
Bring one end around in a loop, and use hot glue to secure in center, as one half of a bow
Bring the other side around, secure with glue, and your ornament is finished!
Instant Pot Christmas Roast
8 years ago


No comments:
Post a Comment